HTML

Viser opslag med etiketten Crochet pattern. Vis alle opslag

søndag den 21. oktober 2018

3i1 Pandebånd


3i1 Pandebånd


Du kan følge mig på Instagram under navnet @ByKirsti og på Facebook under navnet ByKirsti.dk.

Når i deler billeder af ting lavet ud fra mine opskrifter, på Facebook, Instagram osv. må i meget gerne hashtag #ByKirsti eller tagge @ByKirsti. Jeg synes det er fedt at se hvad andre har lavet ud fra opskrifterne!

Design og ophavsretslige rettigheder tilhører Kirsti Testroote, www.ByKirsti.dk

Læs mere om copyright på mine opskrifter på min blog her

 
Du skal bruge:
- Hæklenål nr. 4,5

- Baby AlpakaMerino, Rooster Almerino baby 125m/50g.

 
Forkortelser:
m – maske
vlm – vendeluftmaske
bml – bagerste maskeled
lm - luftmaske
fm – fastmaske
hst – halv stangmaske
stm -stangmaske
rk. - række
gent – gentag

 
Hæklefasthed: i det mønster der er brugt i opskriften: 8rk x 11m = 5x5cm

Størrelser:
Nyfødt: Ca. 6,5cm x 30,5cm
0-6mdr: Ca. 6,5cm x 33cm
6-12mdr: Ca. 7,5cm x 36,5cm
1-3år: Ca. 7,5cm x 40,5cm
3-6år: Ca. 7,5cm x 42,5cm
6-12år: Ca. 7,5cm x 44,5cm
Voksen: Ca. 8,5cm x 50cm,

Tips:
- Str kan nemt varieres, ved at hækle et par ribber mere eller mindre, så pandebåndet bliver kortere eller længere.
-       Hvis du ønsker pandebåndet bredere eller smallere, kan du øge eller mindske antallet af lm med et lige antal (2,4,6 osv.)
-       Juster din hæklefasthed så den passer, ved at gå op eller ned i nål størrelse.
-       Efter hver række skal du have det antal masker, som du slog op fra start, husk vlm tæller som en maske, du vil altid skulle have et lige antal masker.

 
Grundopskrift:

Grundopskriften er ens på de 3 pandebånd.

Nyfødt, (0-6mdr), 6-12mdr, (1-3år), 3-6år, (6-12år), Voksen

Slå 14, (14), 16, (16), 16, (16), 18lm op. Slå løst op eller slå op med en nål der er 0,5 nr. større end den du hækler pandebåndet i.

1.rk: 1stm i 2.lm fra nålen, *1fm, 1stm* gent. ** rk ud. (OBS det kan være svært at se den maske, den sidste stm skal laves i)

Fra nu af hækles alle masker i bml.

2.rk: vend med 1lm, spring 1stm over, *1stm i næste fm fra forrige række, 1fm i næste stm fra forrige række* gent. ** til du når til vlm, lav 1stm i vlm.

Gentag 2. række til arbejdet måler ca 30,5cm, (33cm), 36,5cm, (40,5cm), 42,5cm (44,5cm), 50cm. For at få en pæn finish når pandebåndet sys sammen skal du slutte med et lige antal rækker, da hver rib er = 2rækker.
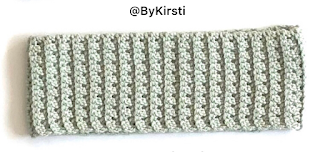
Arbejdet ser nu således ud.

Nu skal du vælge hvilken af de tre stile du gerne vil lave.


Basis modellen - her syes de to ender blot sammen.


Twist modellen – drej den ene ende en halv omgang og sy herefter enderne sammen.


Sløjfe modellen – Sy pandebåndet sammen som basis modellen.
Herefter skal du hækle et bånd, der monteres rundt om pandebåndet og giver sløjfeeffekten.
Bånd:

Slå 4, (4), 4, (4), 5, (5), 5lm op

Alle masker hækles i begge maskeled.
1.rk: 1hst i 2.lm fra nålen, 2hst, (2hst), 2hst, (2hst), 3hst, (3hst), 3hst
2-12.rk: vend med 1lm, 3hst, (3hst), 3hst, (3hst), 4hst, (4hst), 4hst

Hvis båndet er for løst kan du hækle en række eller to færre.

Sløjfen laves således:


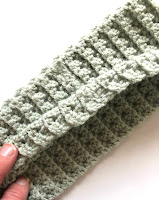
Fold forsiden af pandebåndet sammen på midten.
 
 
Buk siderne ned 
Placer nu båndet rundt om det foldede stykke og sy det sammen.


God fornøjelse!


fredag den 6. januar 2017

Baby barbell pattern

Remember you can follow me on Instagram under the name ByKirsti here and on Facebook under the name ByKirsti.dk here

When you share pictures of finished items made from my patterns, on Facebook, Instagram etc. it would be awesome if you use the hashtag #ByKirsti or tag me @ByKirsti. I think it is cool to see what others have created from my patterns!

Remember to read the part about copyright on my patterns 
here


Materials:
Hook: size 3mm (UK: 11 and US: 2,5)
Yarn: 100% cotton 8, in colours of your choice
Stuffing
Possibly a small bell 

Abbreviations (US terms are used):
Magic ring: mr
Stitches: sts
Slip stitch: sl st
Chain stitch: ch
Single crochet: sc
Single crochet 2 stitches together (to decrease): sc2tog
Repeat: rep
Round: r

NB: Do not join rounds unless otherwise instructed.
Since this item is not meant to fit a specific size, you can experiment with different sizes of hooks and types of yarn. 
The finished size using a size 3 hook and cotton nr. 8 yarn are approximate 21cm.


Ends (make 2): 
1.r: start of with 6sc  in a mr (6sts)
2.r: *2sc in next sts* rep 6 times (12sts)
3.r: *1sc, 2sc  in the next sts* rep 6 times (18sts)
4-10.r: 1sc in each sts (18sts)


The middle part:
1.r: make 18 ch join r with a sl st
2.r: 1sc in each st (18sts)
3-33.r: 1sc in each st (18sts)


The small weight discs (make 2):
1.r: start of with 6sc  in a mr (6sts)
2.r: *2sc in next sts* rep 6 times (12sts)
3.r: *1sc, 2sc  in the next sts* rep 6 times (18sts)
4.r: *2sc, 2sc  in the next sts* rep 6 times (24sts)
5.r: *3sc, 2sc  in the next sts* rep 6 times  (30sts)
6.r: *4sc, 2sc  in the next sts* rep 6 times (36sts)
7-9.r: 1sc in each sts (36sts)
10.r: *4sc, sc2tog* rep 6 times (30sts)
11.r: *3sc, sc2tog* rep 6 times (24sts)
12.r: *2sc, sc2tog* rep 6 times (18sts)
13.r: *1sc, sc2tog* rep 6 times (12sts)


The middle sized weight discs (make 2):
1.r: start of with 6sc  in a mr (6sts)
2.r: *2sc in next sts* rep 6 times (12sts)
3.r: *1sc, 2sc  in the next sts* rep 6 times (18sts)
4.r: *2sc, 2sc  in the next sts* rep 6 times (24sts)
5.r: *3sc, 2sc  in the next sts* rep 6 times  (30sts)
6.r: *4sc, 2sc  in the next sts* rep 6 times (36sts)
7.r: *5sc, 2sc  in the next sts* rep 6 times (42sts)
8.r: *6sc, 2sc  in the next sts* rep 6 times (48sts)
9-11.r: 1sc in each sts (48sts)
12.r: *6sc, sc2tog* rep 6 times  (42sts)
13.r: *5sc, sc2tog* rep 6 times (36sts)
14.r: *4sc, sc2tog* rep 6 times (30sts)
15.r: *3sc, sc2tog* rep 6 times (24sts)
16.r: *2sc, sc2tog* rep 6 times (18sts)
17.r: *1sc, sc2tog* rep 6 times (12sts)


The big weight discs (make 2):
1.r: start of with 6sc  in a mr (6sts)
2.r: *2sc in next sts* rep 6 times (12sts)
3.r: *1sc, 2sc  in the next sts* rep 6 times (18sts)
4.r: *2sc, 2sc  in the next sts* rep 6 times (24sts)
5.r: *3sc, 2sc  in the next sts* rep 6 times  (30sts)
6.r: *4sc, 2sc  in the next sts* rep 6 times (36sts)
7.r: *5sc, 2sc  in the next sts* rep 6 times (42sts)
8.r: *6sc, 2sc  in the next sts* rep 6 times (48sts)
9.r: *7sc, 2sc  in the next sts* rep 6 times (54sts)
10.r: *8sc, 2sc  in the next sts* rep 6 times (60sts)
11-13.r: 1sc in each sts (60sts)
14.r: *8sc, sc2tog* rep 6 times (54sts)
15.r: *7sc, sc2tog* rep 6 times  (48sts)
16.r: *6sc, sc2tog* rep 6 times  (42sts)
17.r: *5sc, sc2tog* rep 6 times (36sts)
18.r: *4sc, sc2tog* rep 6 times (30sts)
19.r: *3sc, sc2tog* rep 6 times (24sts)
20.r: *2sc, sc2tog* rep 6 times (18sts)
21.r: *1sc, sc2tog* rep 6 times (12sts)


You have now finished the 9 parts.

I think the easiest way to attach the parts to each other is to start in the end. Attach an end to the small weight disc, now attach the middle weight disc and at then the big weight disc. Do the same with the other end. At last attach these to the middle part.

I often include a small bell in one of the ends to give it a raddle effect.

I hope you had fun making the Baby barbell!


lørdag den 26. november 2016

Baby dumbbell pattern


Materials:
Hook: size 3mm (UK: 11 and US: 2,5)
Yarn: 100% cotton 8, in colours of your choice
Stuffing
Possibly a small bell

Abbreviations (US terms are used):
Magic ring: mr
Stitches: sts
Slip stitch: sl st
Chain stitch: ch
Single crochet: sc
Single crochet 2 stitches together (to decrease): sc2tog
Repeat: rep
Round: r

NB: Do not join rounds unless otherwise instructed.
Since this item is not meant to fit a specific size, you can experiment with different sizes of hooks and types of yarn.
The finished size using a size 3 hook and cotton nr. 8 yarn are approximate 18cm.


The ends (make 2):
1.r: start of with 6sc  in a mr (6sts)
2.r: *2sc in next sts* rep 6 times (12sts)
3.r: *1sc, 2sc  in the next sts* rep 6 times (18sts)
4-8.r: 1sc in each sts (18sts)


The middle part:
1.r: make 18 ch join r with a sl st
2.r: 1sc in each st (18sts)
3-23.r: 1sc in each st (18sts)


The weight discs (make 2):
1.r: start of with 6sc  in a mr (6sts)
2.r: *2sc in next sts* rep 6 times (12sts)
3.r: *1sc, 2sc  in the next sts* rep 6 times (18sts)
4.r: *2sc, 2sc  in the next sts* rep 6 times (24sts)
5.r: *3sc, 2sc  in the next sts* rep 6 times  (30sts)
6.r: *4sc, 2sc  in the next sts* rep 6 times (36sts)
7.r: *5sc, 2sc  in the next sts* rep 6 times (42sts)
8.r: *6sc, 2sc  in the next sts* rep 6 times (48sts)
9.r: *7sc, 2sc  in the next sts* rep 6 times (54sts)
10.r: *8sc, 2sc  in the next sts* rep 6 times (60sts)
11.r: *9sc, 2sc  in the next sts* rep 6 times (66sts)
12.r: *10sc, 2sc  in the next sts* rep 6 times (72sts)
13-16.r: 1sc in each sts (72sts)
17.r: *10sc, sc2tog* rep 6 times (66sts)
18.r: *9sc, sc2tog* rep 6 times  (60sts)
19.r: *8sc, sc2tog* rep 6 times (54sts)
20.r: *7sc, sc2tog* rep 6 times  (48sts)
21.r: *6sc, sc2tog* rep 6 times  (42sts)
22.r: *5sc, sc2tog* rep 6 times (36sts)
23.r: *4sc, sc2tog* rep 6 times (30sts)
24.r: *3sc, sc2tog* rep 6 times (24sts)
25.r: *2sc, sc2tog* rep 6 times (18sts)
26.r: *1sc, sc2tog* rep 6 times (12sts)

Before making the last round you should stuff cotton in the weight disc.

27.r: *sc2tog* rep 6 times (6sts)

You now have the 5 finished parts.
I think the easiest way to attach the parts to each other is to start in the end. Attach an end to each weight disc and then attach these to the middle part.
I often include a small bell in one of the ends to give it a raddle effect.


I hope you had fun making the Baby dumbbell!


Read about copyright on my patterns here

fredag den 27. november 2015

Silly Turtles pattern


Remember you can follow me on Instagram under the name ByKirsti here and on Facebook under the name ByKirsti.dk here

When you share pictures of finished items made from my patterns, on Facebook, Instagram etc. it would be awesome if you use the hashtag #ByKirsti or tag me @ByKirsti. I think it is cool to see what others have created from my patterns!

Remember to read the part about copyright on my patterns here


Materials: 
Hook: size 3mm (UK: 11 and US: 2,5) 
Yarn: 100% cotton 8, in colours of your choice 
Stuffing 

Abbreviations (US terms are used): 
Magic ring: mr 
Stitches: sts 
Stitch: st 
Slip stitch: sl st 
Chain stitch: ch 
Single crochet: sc 
Half double crochet: hdc
Double crochet: dc 
Single crochet 2 stitches together (to decrease): sc2tog 
Repeat: rep 
Round: rnd 
Row: row 

NB: Do not join rounds unless otherwise instructed. 
Since this item is not meant to fit a specific size, you can experiment with different sizes of hooks and types of yarn. 

The turtles are created from the same pattern. I’ve have given the girl a feminine edge on the shell and the eyes are different to give them their own look.


Belly: 
1.rnd: start of with 6sc in a mr (6sts) 
2.rnd: *2sc in next st* rep 6 times (12sts) 
3.rnd: *1sc, 2sc in the next st* rep 6 times (18sts) 
4.rnd: *2sc, 2sc in the next st* rep 6 times (24sts) 
5.rnd: *3sc, 2sc in the next st* rep 6 times (30sts) 
6.rnd: *4sc, 2sc in the next st* rep 6 times (36sts) 
7.rnd: *5sc, 2sc in the next st* rep 6 times (42sts) 
8.rnd: *6sc, 2sc in the next st* rep 6 times (48sts) 
9.rnd: *7sc, 2sc in the next st* rep 6 times (54sts) 
10.rnd: *8sc, 2sc in the next st* rep 6 times (60sts) 
11.rnd: *9sc, 2sc in the next st* rep 6 times (66sts) 
12.rnd: *10sc, 2sc in the next st* rep 6 times (72sts) 
13.rnd: *11sc, 2sc in the next st* rep 6 times (78sts)

Shell: 
1.rnd: start of with 6sc in a mr (6sts) 
2.rnd: *2sc in next st* rep 6 times (12sts) 
3.rnd: *1sc, 2sc in the next st* rep 6 times (18sts) 
4.rnd: *2sc, 2sc in the next st* rep 6 times (24sts) 
5.rnd: *3sc, 2sc in the next st* rep 6 times (30sts) 
6.rnd: *4sc, 2sc in the next st* rep 6 times (36sts) 
7.rnd: *5sc, 2sc in the next st* rep 6 times (42sts) 
8.rnd: 1sc in each st (42sts) 
9.rnd: *6sc, 2sc in the next st* rep 6 times (48sts) 
10.rnd: *7sc, 2sc in the next st* rep 6 times (54sts) 
11.rnd: *8sc, 2sc in the next st* rep 6 times (60sts) 
12.rnd: *9sc, 2sc in the next st* rep 6 times (66sts) 
13.rnd: 1sc in each st (66sts) 
14.rnd: *10sc, 2sc in the next sts rep 6 times (72sts) 
15.rnd: *11sc, 2sc in the next sts rep 6 times (78sts) 
16.-18.rnd: 1sc in each st (78sts)

Attach the belly and shell to each other like this: 
Place the shell and belly with the two wrong sites facing each other. The belly should be placed under the shell. Crochet the two parts together with 1sc in each st all the way around. 

The boy: end the row with 1 sl st. 

The girl: continue with the edging like this: 1 sl st *1sc, 1hdc, 2dc in the next st, 1hdc, 1sc, 1sl st* rep ** all the way around the turtle. Finish with 1sl st.


Tale:
1.rnd: start of with 6sc in a mr (6sts)
2.rnd: *1sc, 2sc in the next st* rep 6 times (9sts)
3.rnd: 1sc in each st (9sts)
4.rnd: *2sc, 2sc in the next st* rep 6 times (12sts)
5.rnd: 1sc in each st (12sts)

Head:
1.rnd: start of with 6sc in a mr (6sts)
2.rnd: *2sc in next st* rep 6 times (12sts)
3.rnd: *1sc, 2sc in the next st* rep 6 times (18sts)
4.rnd: *2sc, 2sc in the next st* rep 6 times (24sts)
5.rnd: *3sc, 2sc in the next st* rep 6 times (30sts)
6.rnd: *4sc, 2sc in the next st* rep 6 times (36sts)
7.rnd: *5sc, 2sc in the next st* rep 6 times (42sts)
8.-13rnd: 1sc in each st (42sts)
14.rnd: *5sc, sc2tog* rep 6 times (36sts)
15.rnd: *4sc, sc2tog* rep 6 times (30sts)
16.rnd: *3sc, sc2tog* rep 6 times (24sts)
17.rnd: *2sc, sc2tog* rep 6 times (18sts)
18.rnd: *1sc, sc2tog* rep 6 times (12sts)
19.-31rnd: 1sc in each st (12sts)

Legs (make 4):
1.rnd: start of with 6sc in a mr (6sts)
2.rnd: *2sc in next st* rep 6 times (12sts)
3.rnd: *1sc, 2sc in the next st* rep 6 times (18sts)
4.-5.rnd: 1sc in each st (18sts)
6.rnd: *7sc, sc2tog* rep 2 times (16sts)
7.rnd: 1sc in each st (16sts)
8.rnd: *6sc, sc2tog* rep 2 times (14sts)
9.rnd: 1sc in each st (14sts)
10.rnd: *5sc, sc2tog* rep 2 times (12sts)


The girls eyes:

White part (make 2): 
1.rnd: start of with 4sc in a mr (4sts)
2.rnd: *2sc in next st* rep 4 times (8sts)
3.rnd: 1sc in each st (8sts)

Black part (make 2): 
1.rnd: 4sc in a mr (4sts)

Eyelids (make 2):
1.row: 4sc in a mr (4sts)
2.row: turn with a ch, *2sc in next st* rep 4 times (8sts)
3.row: turn with a ch, 1sc in each st (8sts)


The boys eyes: 

White part (make 2): 
1.rnd: start of with 6sc in a mr (6sts)
2.rnd: *2sc in next st* rep 6 times (12sts)
End with a sl st to join the round

Black part (make 2): 
1.rnd: 4sc in a mr (4sts)
End with a sl st to join the round


Attaching the parts: 

Since the belly and shell are crocheted together in the same color as the shell, it makes it easier if you make the belly first.

If you attach the tale and head first it makes it easier to place the legs symmetrical.

Head and tale are attached like on the photo.


Stitch the black part of the eyes to the white part before attaching them to the turtles head.
Use black yarn to stitch the mouth.

Have fun!